Leverage Terraform to Create an Apache ShardingSphere Proxy High Availability Cluster on AWS
For this ShardingSphere blog entry, we want you to take advantage of the benefits of IaC (Infrastructure as Code) by deploying and managing a ShardingSphere Proxy cluster the IaC way.
With this in mind, we plan to use Terraform to create a ShardingSphere-Proxy high availability cluster with multiple availability zones.
Background
Terraform
Terraform is Hashicorp’s open source infrastructure automation orchestration tool that uses IaC philosophy to manage infrastructure changes.
It’s supported by public cloud vendors such as AWS, GCP, AZURE and a variety of other providers from the community, and has become one of the most popular practices in the “Infrastructure as Code” space.
Terraform has the following advantages:
Support for multi-cloud deployments
Terraform is suitable for multi-cloud scenarios, deploying similar infrastructures such as Alibaba Cloud, or other cloud providers and local data centres. Developers can use the same tools and similar profiles to manage resources from different cloud providers simultaneously.
Automated management infrastructure
Terraform’s ability to create reusable modules reduces human-induced deployment and management errors.
Infrastructure as code
Resources can be managed and maintained in code, allowing infrastructure state to be saved. This enables users to track changes made to different components of the system (infrastructure as code) and share these configurations with others.
ShardingSphere-Proxy
Apache ShardingSphere is a distributed database ecosystem that transforms any database into a distributed database and enhances it with data sharding, elastic scaling, encryption and other capabilities.
ShardingSphere-Proxy is positioned as a transparent database proxy that supports any client using MySQL, PostgreSQL, or openGauss protocols to manage data, and is more friendly to heterogeneous languages and DevOps scenarios.
ShardingSphere-Proxy is non-intrusive to the application code: users only need to change the connection string of the database to achieve data sharding, read/write separation, etc. As part of the data infrastructure, its high availability will be key.
Deployment with Terraform
Before we start writing the Terraform configuration, we need to understand the basic architecture of the ShardingSphere-Proxy cluster
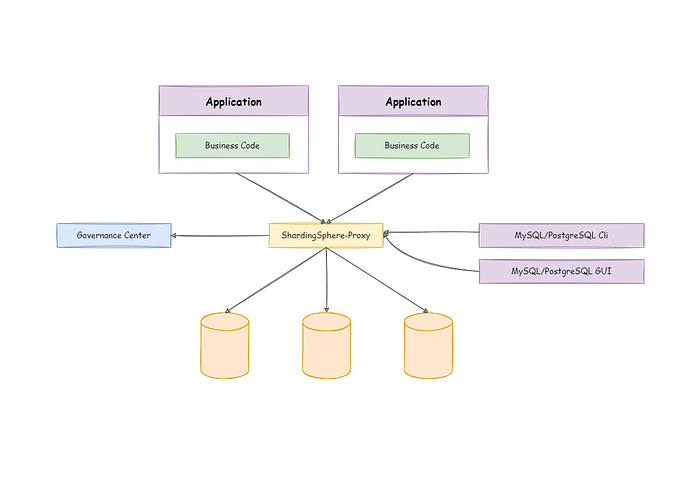
We use ZooKeeper as the Governance Center.
As you can see, ShardingSphere-Proxy itself is a stateless application, and in a real world scenario, load balancing is provided externally, and the load balancing is used to flexibly distribute traffic between the instances.
To ensure high availability of the ZooKeeper and ShardingSphere-Proxy cluster, the following architecture will be used:
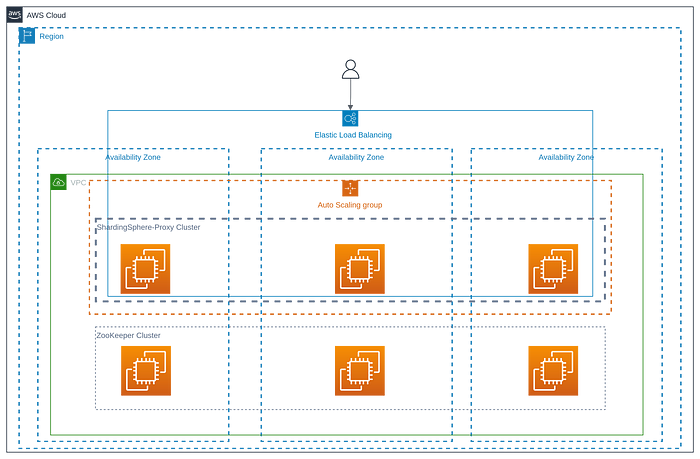
ZooKeeper Cluster
Define Input Parameters
For the purpose of reusable configuration, a series of variables are defined, as follows:
variable "cluster_size" {
  type        = number
  description = "The cluster size that same size as available_zones"
}

variable "key_name" {
  type        = string
  description = "The ssh keypair for remote connection"
}

variable "instance_type" {
  type        = string
  description = "The EC2 instance type"
}

variable "vpc_id" {
  type        = string
  description = "The id of VPC"
}

variable "subnet_ids" {
  type        = list(string)
  description = "List of subnets sorted by availability zone in your VPC"
}

variable "security_groups" {
  type        = list(string)
  default     = []
  description = "List of the Security Group, it must be allow access 2181, 2888, 3888 port"
}


variable "hosted_zone_name" {
  type        = string
  default     = "shardingsphere.org"
  description = "The name of the hosted private zone"
}

variable "tags" {
  type        = map(any)
  description = "A map of zk instance resource, the default tag is Name=zk-$${count.idx}"
  default     = {}
}

variable "zk_version" {
  type        = string
  description = "The zookeeper version"
  default     = "3.7.1"
}

variable "zk_config" {
  default = {
    client_port = 2181
    zk_heap     = 1024
  }

  description = "The default config of zookeeper server"
}
These variables can also be changed when installing the ShardingSphere-Proxy cluster below.
Configure ZooKeeper Cluster
For instance of the ZooKeeper service, we have used the AWS native amzn2-ami-hvm image.
We used the count parameter to deploy the ZooKeeper service, which indicates the number of nodes in the ZooKeeper cluster created by Terraform as var.cluster_size.
When creating a ZooKeeper instance, we use the ignore_changesparameter to ignore artificial changes to the tag to avoid the instance being recreated the next time Terraform is run.
We use cloud-init to reboot the ZooKeeper-related configuration, as described in here.
We create a domain name for each ZooKeeper service and the application only needs to use the domain name to avoid problems with changing the IP address when the ZooKeeper service is restarted.
data "aws_ami" "base" {
  owners = ["amazon"]

  filter {
    name   = "name"
    values = ["amzn2-ami-hvm-*-x86_64-ebs"]
  }

  most_recent = true
}

data "aws_availability_zones" "available" {
  state = "available"
}

resource "aws_network_interface" "zk" {
  count           = var.cluster_size
  subnet_id       = element(var.subnet_ids, count.index)
  security_groups = var.security_groups
}

resource "aws_instance" "zk" {
  count         = var.cluster_size
  ami           = data.aws_ami.base.id
  instance_type = var.instance_type
  key_name      = var.key_name

  network_interface {
    delete_on_termination = false
    device_index          = 0
    network_interface_id  = element(aws_network_interface.zk.*.id, count.index)
  }

  tags = merge(
    var.tags,
    {
      Name = "zk-${count.index}"
    }
  )

  user_data = base64encode(templatefile("${path.module}/cloud-init.yml", {
    version     = var.zk_version
    nodes       = range(1, var.cluster_size + 1)
    domain      = var.hosted_zone_name
    index       = count.index + 1
    client_port = var.zk_config["client_port"]
    zk_heap     = var.zk_config["zk_heap"]
  }))

  lifecycle {
    ignore_changes = [
      # Ignore changes to tags.
      tags
    ]
  }
}

data "aws_route53_zone" "zone" {
  name         = "${var.hosted_zone_name}."
  private_zone = true
}

resource "aws_route53_record" "zk" {
  count   = var.cluster_size
  zone_id = data.aws_route53_zone.zone.zone_id
  name    = "zk-${count.index + 1}"
  type    = "A"
  ttl     = 60
  records = element(aws_network_interface.zk.*.private_ips, count.index)
}
Define Output
The IP of the ZooKeeper service instance and the corresponding domain name will be output after a successful run of terraform apply.
output "zk_node_private_ip" {
  value       = aws_instance.zk.*.private_ip
  description = "The private ips of zookeeper instances"
}

output "zk_node_domain" {
  value       = [for v in aws_route53_record.zk.*.name : format("%s.%s", v, var.hosted_zone_name)]
  description = "The private domain names of zookeeper instances for use by ShardingSphere Proxy"
}
ShardingSphere-Proxy Cluster
Define Input Parameters
The purpose of defining input parameters is also for the sake of configuration reusability.
variable "cluster_size" {
  type        = number
  description = "The cluster size that same size as available_zones"
}

variable "shardingsphere_proxy_version" {
  type        = string
  description = "The shardingsphere proxy version"
}

variable "shardingsphere_proxy_asg_desired_capacity" {
  type        = string
  default     = "3"
  description = "The desired capacity is the initial capacity of the Auto Scaling group at the time of its creation and the capacity it attempts to maintain. see https://docs.aws.amazon.com/AWSCloudFormation/latest/UserGuide/aws-properties-as-group.html#cfn-as-group-desiredcapacitytype, The default value is 3"
}

variable "shardingsphere_proxy_asg_max_size" {
  type        = string
  default     = "6"
  description = "The maximum size of ShardingSphere Proxy Auto Scaling Group. The default values is 6"
}

variable "shardingsphere_proxy_asg_healthcheck_grace_period" {
  type        = number
  default     = 120
  description = "The amount of time, in seconds, that Amazon EC2 Auto Scaling waits before checking the health status of an EC2 instance that has come into service and marking it unhealthy due to a failed health check. see https://docs.aws.amazon.com/autoscaling/ec2/userguide/health-check-grace-period.html"
}

variable "image_id" {
  type        = string
  description = "The AMI id"
}

variable "key_name" {
  type        = string
  description = "the ssh keypair for remote connection"
}

variable "instance_type" {
  type        = string
  description = "The EC2 instance type"
}

variable "vpc_id" {
  type        = string
  description = "The id of your VPC"
}

variable "subnet_ids" {
  type        = list(string)
  description = "List of subnets sorted by availability zone in your VPC"
}

variable "security_groups" {
  type        = list(string)
  default     = []
  description = "List of The Security group IDs"
}

variable "lb_listener_port" {
  type        = string
  description = "lb listener port"
}

variable "hosted_zone_name" {
  type        = string
  default     = "shardingsphere.org"
  description = "The name of the hosted private zone"
}

variable "zk_servers" {
  type        = list(string)
  description = "The Zookeeper servers"
}
Configure ShardingSphere-Proxy Cluster
Configure AutoScalingGroup
We’ll create an AutoScalingGroup to allow it to manage ShardingSphere-Proxy instances. The health check type of the AutoScalingGroup is changed to “ELB” to allow the AutoScalingGroup to move out bad nodes in time after load balancing fails to perform a health check on the instance.
The changes to load_balancers and target_group_arns are ignored when creating the AutoScalingGroup.
We also use cloud-init to configure the ShardingSphere-Proxy instance, as described here.
resource "aws_launch_template" "ss" {
  name                                 = "shardingsphere-proxy-launch-template"
  image_id                             = var.image_id
  instance_initiated_shutdown_behavior = "terminate"
  instance_type                        = var.instance_type
  key_name                             = var.key_name
  iam_instance_profile {
    name = aws_iam_instance_profile.ss.name
  }

  user_data = base64encode(templatefile("${path.module}/cloud-init.yml", {
    version    = var.shardingsphere_proxy_version
    version_elems = split(".", var.shardingsphere_proxy_version)
    zk_servers = join(",", var.zk_servers)
  }))

  metadata_options {
    http_endpoint               = "enabled"
    http_tokens                 = "required"
    http_put_response_hop_limit = 1
    instance_metadata_tags      = "enabled"
  }

  monitoring {
    enabled = true
  }

  vpc_security_group_ids = var.security_groups

  tag_specifications {
    resource_type = "instance"

    tags = {
      Name = "shardingsphere-proxy"
    }
  }
}

resource "aws_autoscaling_group" "ss" {
  name                      = "shardingsphere-proxy-asg"
  availability_zones        = data.aws_availability_zones.available.names
  desired_capacity          = var.shardingsphere_proxy_asg_desired_capacity
  min_size                  = 1
  max_size                  = var.shardingsphere_proxy_asg_max_size
  health_check_grace_period = var.shardingsphere_proxy_asg_healthcheck_grace_period
  health_check_type         = "ELB"

  launch_template {
    id      = aws_launch_template.ss.id
    version = "$Latest"
  }

  lifecycle {
    ignore_changes = [load_balancers, target_group_arns]
  }
}
Configure load balancing
The AutoScalingGroup created in the previous step is attached to the load balancing and traffic passing through the load balancing is automatically routed to the ShardingSphere-Proxy instance created by the AutoScalingGroup.
resource "aws_lb_target_group" "ss_tg" {
  name               = "shardingsphere-proxy-lb-tg"
  port               = var.lb_listener_port
  protocol           = "TCP"
  vpc_id             = var.vpc_id
  preserve_client_ip = false

  health_check {
    protocol = "TCP"
    healthy_threshold = 2
    unhealthy_threshold = 2
  }

  tags = {
    Name = "shardingsphere-proxy"
  }
}

resource "aws_autoscaling_attachment" "asg_attachment_lb" {
  autoscaling_group_name = aws_autoscaling_group.ss.id
  lb_target_group_arn    = aws_lb_target_group.ss_tg.arn
}


resource "aws_lb_listener" "ss" {
  load_balancer_arn = aws_lb.ss.arn
  port              = var.lb_listener_port
  protocol          = "TCP"

  default_action {
    type             = "forward"
    target_group_arn = aws_lb_target_group.ss_tg.arn
  }

  tags = {
    Name = "shardingsphere-proxy"
  }
}
Configure Domain Name
We will create an internal domain name that defaults to proxy.shardingsphere.org, which actually points internally to the load balancing created in the previous step.
data "aws_route53_zone" "zone" {
  name         = "${var.hosted_zone_name}."
  private_zone = true
}

resource "aws_route53_record" "ss" {
  zone_id = data.aws_route53_zone.zone.zone_id
  name    = "proxy"
  type    = "A"

  alias {
    name                   = aws_lb.ss.dns_name
    zone_id                = aws_lb.ss.zone_id
    evaluate_target_health = true
  }
Configure CloudWatch
We will go through the STS to create a role with CloudWatch permissions, which will be attached to the ShardingSphere-Proxy instance created by AutoScalingGroup.
The runtime logs of the ShardingSphere-Proxy will be captured by the CloudWatch Agent on CloudWatch. A log_group named shardingsphere-proxy.log is created by default.
The specific configuration of CloudWatch is described here.
resource "aws_iam_role" "sts" {
  name = "shardingsphere-proxy-sts-role"

  assume_role_policy = <<EOF
{
  "Version": "2012-10-17",
  "Statement": [
    {
      "Action": "sts:AssumeRole",
      "Principal": {
        "Service": "ec2.amazonaws.com"
      },
      "Effect": "Allow",
      "Sid": ""
    }
  ]
}
EOF
}

resource "aws_iam_role_policy" "ss" {
  name = "sharidngsphere-proxy-policy"
  role = aws_iam_role.sts.id

  policy = <<EOF
{
  "Version": "2012-10-17",
  "Statement": [
    {
      "Action": [
        "cloudwatch:PutMetricData",
        "ec2:DescribeTags",
        "logs:PutLogEvents",
        "logs:DescribeLogStreams",
        "logs:DescribeLogGroups",
        "logs:CreateLogStream",
        "logs:CreateLogGroup"
      ],
      "Effect": "Allow",
      "Resource": "*"
    }
  ]
}
EOF
}

resource "aws_iam_instance_profile" "ss" {
  name = "shardingsphere-proxy-instance-profile"
  role = aws_iam_role.sts.name
}
Deployment
Once all Terraform configurations have been created, you’ll be ready to deploy the ShardingSphere-Proxy cluster. Before actually deploying, it’s recommended that you use the following command to check that the configuration performs as expected.
terraform plan
After confirming the plan, it’s time to go ahead and actually execute it by running the following command
terraform apply
The full code can be found here. Alternatively, check out our website for more.
Test
The goal of the test is to prove that the cluster created is usable. We use a simple case: we add two data sources and create a simple sharding rule using DistSQL, then insert the data and the query returns the correct result.
By default, we create an internal domain proxy.shardingsphere.org and the username and password for the ShardingSphere-Proxy cluster are both root.

Description:
DistSQL (Distributed SQL) is Apache ShardingSphere’s SQL-like operational language. It’s used in exactly the same way as standard SQL to provide SQL-level manipulation capabilities for incremental functionality, as described here.
Conclusion
Terraform is an excellent tool to help you implement IaC. Terraform will be very useful for iterating over ShardingSphere-Proxy clusters. I hope this article has helped anyone interested in ShardingSphere and Terraform.
Relevant Links:
🔗 ShardingSphere-on-Cloud Github
🔗 ShardingSphere-on-Cloud Official Website
🔗 Apache ShardingSphere GitHub