A Step-by-Step Guide to Data Migration: Unlocking Distributed Database Potential with ShardingSphere
As businesses grow and data volumes and concurrent transactions surge, traditional standalone databases often face challenges related to performance, scalability, and availability. To overcome these limitations, the industry has introduced NoSQL solutions, employing techniques like data sharding and horizontal scaling. However, NoSQL databases often lack support for transactions and structured query language (SQL). This is where ShardingSphere comes into play.
Apache ShardingSphere offers a distributed SQL transaction & query engine capable of transforming any conventional database into a distributed one. By leveraging advanced features like data sharding, elastic scaling, and data encryption, ShardingSphere ensures improved performance, scalability, and data security.
In this blog post, we will delve into ShardingSphere’s data migration function and provide you with a comprehensive, step-by-step guide on how to build a distributed database. Assuming little prior knowledge, we’ll explore the intricacies of data migration, allowing you to leverage ShardingSphere’s power for seamless database transitions.
Data Migration with ShardingSphere - A Closer Look
Let’s now explore one of the core features of ShardingSphere—data migration—and gain insights into its functionality and benefits. In this section, we’ll focus on using MySQL as the target database and provide a step-by-step demonstration of the entire migration process.
Introduction to Data Migration in ShardingSphere
ShardingSphere’s data migration functionality is seamlessly integrated into ShardingSphere-Proxy, requiring no additional dependencies. Whether you need to upgrade your databases or create backups, ShardingSphere-Proxy’s built-in data migration feature has got you covered. With this approach, you can simplify your project’s development and maintenance process by avoiding the need for additional modules.
Scope of Data Migration Support
ShardingSphere data migration currently supports the following database types out of the box:
- MySQL
- PostgreSQL
- openGauss
Furthermore, ShardingSphere facilitates data migration across homogeneous and heterogeneous databases that support the aforementioned protocols. This flexibility allows businesses to seamlessly migrate data between different database systems, regardless of their underlying architecture.
Supported Database Versions and Configuration Examples
To ensure compatibility, ShardingSphere provides data migration support for various database versions. The table below showcases the database versions and offers configuration examples for a smooth migration:
| Database Type | Supported Versions | Required Environment | Required Permission |
| MySQL | 5.1.15 - 8.0.x | my.cnf configuration
log-bin=binlog binlog-format=row binlog-row-image=full |
GRANT REPLICATION SLAVE,REPLICATION
CLIENT ON .TO ${usernamet}@${host} |
| PostgreSQL | 9.4 and above | postgresql.conf configuration
wal_level = logical max_wal_senders = 10 max_replication_slots = 10 max_connections = 600 |
pg_hba.conf configuration
host all ${username} 0.0.0.0/0 md5 |
| openGauss | 2.0.1 - 3.1.x | postgresgl.conf configuration
wal_level = logical max_wal_senders = 10 max_replication_slots = 10 max_connections = 600 wal_sender_timeout = 0 |
pg_hba.conf configuration
host all ${username} 0.0.0.0/0 md5 |
To fully grasp the data migration process in ShardingSphere, it’s important to familiarize yourself with some key concepts. Understanding these concepts will enable you to navigate the migration journey seamlessly. Let’s explore these concepts:
- Source Database: The source database refers to the storage cluster where the original data resides. This is the database that you intend to migrate from.
- Target Database: The target database represents the storage cluster where the original data will be migrated to. This is the database you aim to migrate your data into, transforming it into a distributed database.
- Stock Data: Stock data refers to the existing data present in the database node before initiating the migration process. This data forms the foundation of the migration process and serves as the starting point for data transfer.
- Incremental Data: Incremental data comprises the new data generated in the business system during the migration process. As migration unfolds, the business system continues to generate new data. Capturing and transferring this incremental data is crucial to ensuring data integrity and consistency during the migration process.
By understanding these key concepts, you’ll be better equipped to embark on a successful data migration journey using ShardingSphere.
Deployment Architecture
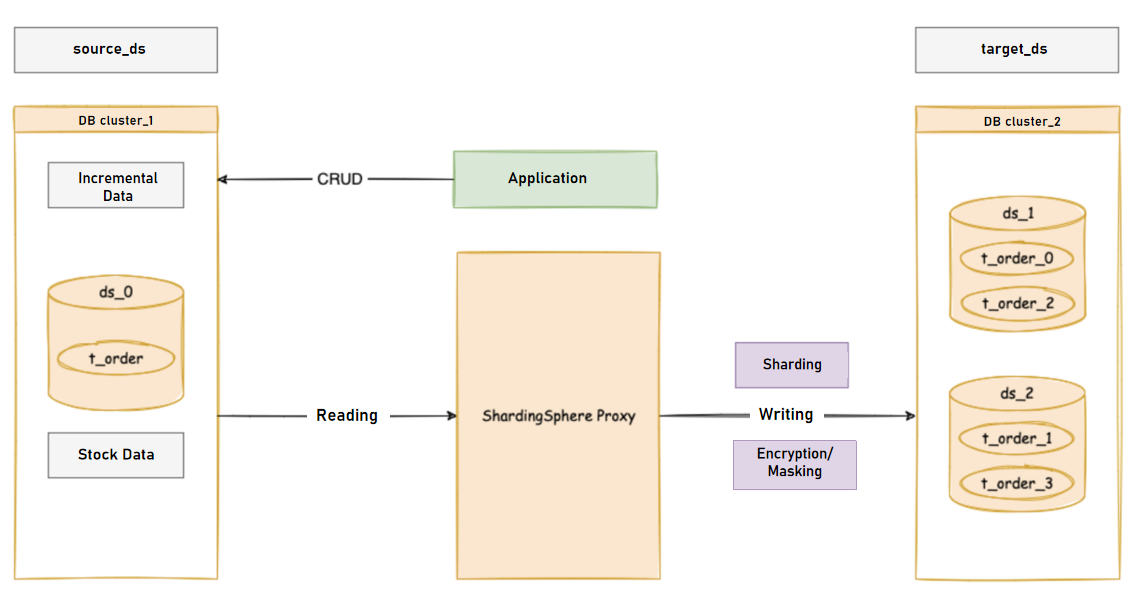
In the architecture of ShardingSphere, ShardingSphere-Proxy serves as the computing node, while MySQL functions as the storage node. ShardingSphere-Proxy plays a crucial role in data migration and database operations, while MySQL serves as the underlying storage for the distributed database.
Performing Data Migration
Now, let’s dive into the practical steps to perform data migration using ShardingSphere with MySQL as the target database.

The figure above provides an overview of the entire migration process in which ShardingSphere-Proxy reads the full and incremental data from the source database and writes them to the target database.
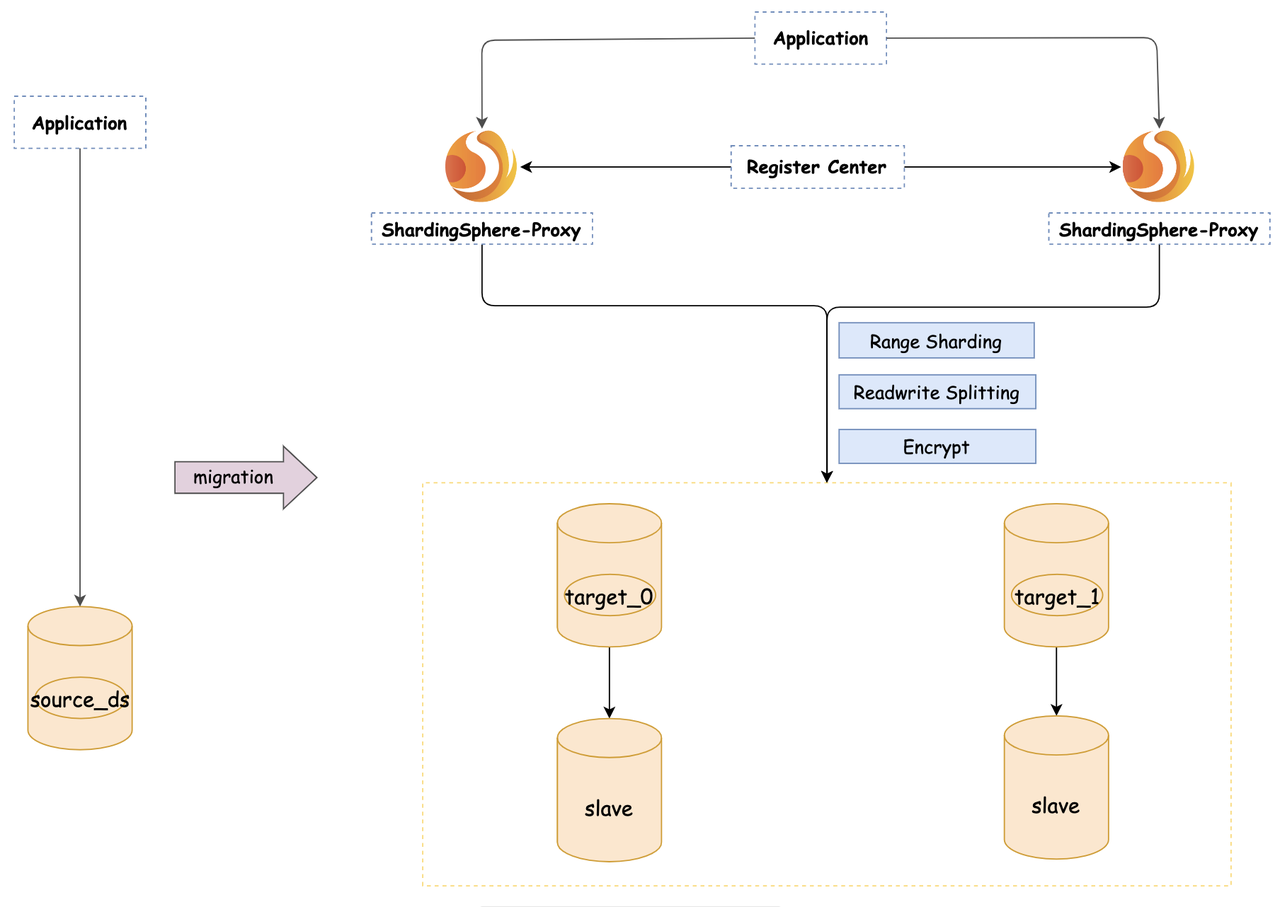
To help you navigate the process of performing data migration, we have outlined practical steps below in the following figure. These steps will guide you through the process seamlessly.
The stages breakdown below will guide you through the process seamlessly:
- Environment Preparation: Before diving into the data migration process, ensure you have the following components set up:
- ShardingSphere Version: Make sure you have ShardingSphere version 5.4.0 or above installed. Alternatively, you can use the master branch version. Additionally, ensure that you are operating in cluster mode.
- MySQL Databases: Prepare one source database and two target databases—a master database and a replica. These databases will be involved in the data migration process.
- Register Center: Utilize ZooKeeper version 3.8.0 as the registry center for ShardingSphere cluster mode. This will facilitate seamless communication and coordination within the cluster.
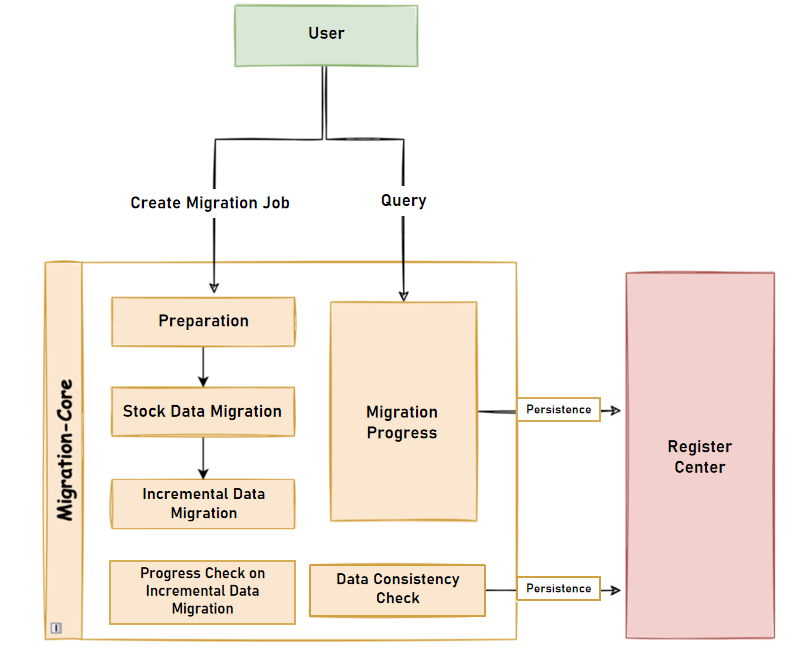
- Data Migration Process:
- Preparation Stage: In this initial stage, the data migration module performs several tasks, including checking the connectivity and authority of the data source. It also conducts data stock statistics, logs recording sites, and initializes tasks to prepare for the migration process.
- Stock Data Migration: During this stage, JDBC queries are employed to directly read data from the source database and write it to the target database based on the configured sharding rules. This migration ensures that existing stock data is transferred accurately and securely.
- Incremental Data Migration: As the migration of stock data may take varying amounts of time due to factors like data volume and parallel processing, it is essential to synchronize the newly generated incremental data. For MySQL databases, this synchronization is achieved by subscribing to and parsing binlog logs. Once the initial synchronization of incremental data is complete, continuous traffic can be switched to the target database.
- Traffic Switching: Upon completion of the data migration process, users can switch the read or write traffic to ShardingSphere, effectively utilizing the newly built distributed database.
- Monitoring and Data Consistency Verification: Throughout the migration process, users can monitor the progress in real-time using DistSQL. Additionally, the data consistency verification feature allows you to compare the data before and after migration, ensuring the accuracy and consistency of the migrated data.
Data Migration Steps
Let’s first start by granting the relevant permissions.
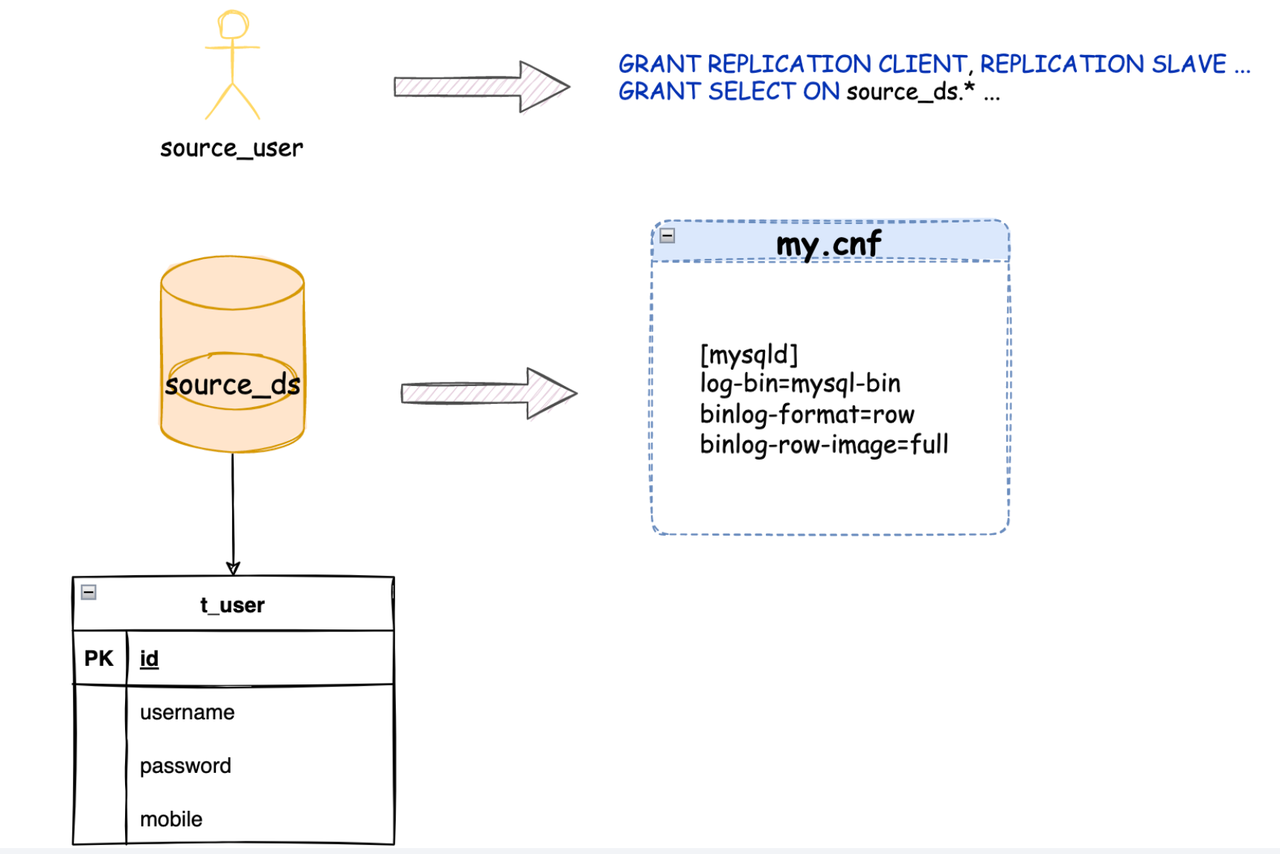
Database Permission Configuration
It is necessary to configure migration permissions on the source database, as the administrator account is generally not used for data migration.
Additionally, if the target database uses a common account, it’s important to grant the corresponding permissions beforehand.
GRANT CREATE, ALTER, DROP, SELECT, INSERT, UPDATE, DELETE, INDEX ON target_ds_0.* TO target_user;
GRANT CREATE, ALTER, DROP, SELECT, INSERT, UPDATE, DELETE, INDEX ON target_ds_1.* TO target_user;
Once you have granted the necessary permissions, begin by initializing the source tables in the source database. This involves simulating initial data that will serve as the foundation for the migration process.
Step 1: Initialize Data in the Source Database
- Initialize tables in the source database: Create the necessary tables in the source database and populate them with initial data.
CREATE TABLE t_user
(
    id       int auto_increment,
    username varchar(64)  null,
    password varchar(255) null,
    mobile   varchar(64)  null,
    constraint t_user_pk primary key (id)
);
- Simulate initial data: Generate simulated data to ensure the source database contains representative information for migration.
INSERT INTO t_user (id, username, password, mobile) VALUES (1, 'jack', '123456', '13111111111');
INSERT INTO t_user (id, username, password, mobile) VALUES (2, 'rose', '234567', '13111111112');
INSERT INTO t_user (id, username, password, mobile) VALUES (3, 'mike', 'aaa123', '13111111113');
INSERT INTO t_user (id, username, password, mobile) VALUES (4, 'bob', 'aaabbb', '13111111114');
Step 2: Initialize ShardingSphere-Proxy Rules
Next, start ShardingSphere-Proxy in cluster mode and log in through the database client. Execute the commands to create the necessary databases and initialize the rule definitions.
mysql> create database sharding_db;
Query OK, 0 rows affected (0.12 sec)

mysql> use sharding_db
Database changed
- Use DistSQL to add storage units: Configure the storage units for ShardingSphere-Proxy.
REGISTER STORAGE UNIT target_ds_0  (
     URL="jdbc:mysql://localhost:3306/target_ds_0?serverTimezone=UTC&useSSL=false&allowPublicKeyRetrieval=true",
     USER="target_user",
     PASSWORD="root"
);
REGISTER STORAGE UNIT target_ds_1  (
     URL="jdbc:mysql://localhost:3306/target_ds_1?serverTimezone=UTC&useSSL=false&allowPublicKeyRetrieval=true",
     USER="target_user",
     PASSWORD="root"
);
REGISTER STORAGE UNIT read_ds_0  (
     URL="jdbc:mysql://localhost:3308/target_ds_0?serverTimezone=UTC&useSSL=false&allowPublicKeyRetrieval=true",
     USER="target_user",
     PASSWORD="root"
);
REGISTER STORAGE UNIT read_ds_1  (
     URL="jdbc:mysql://localhost:3308/target_ds_1?serverTimezone=UTC&useSSL=false&allowPublicKeyRetrieval=true",
     USER="target_user",
     PASSWORD="root"
);
-
Initialize rule definition:
a. Initialize read/write splitting rules: Define the rules for routing read and write operations.
CREATE READWRITE_SPLITTING RULE rw_ds_0 (
    WRITE_STORAGE_UNIT=target_ds_0,
    READ_STORAGE_UNITS(read_ds_0),
    TYPE(NAME="random")
);
CREATE READWRITE_SPLITTING RULE rw_ds_1 (
    WRITE_STORAGE_UNIT=target_ds_1,
    READ_STORAGE_UNITS(read_ds_1),
    TYPE(NAME="random")
);
b. Initialize sharding rules: Configure the sharding rules for distributing data across multiple nodes.
CREATE SHARDING TABLE RULE t_user(
        STORAGE_UNITS(rw_ds_0, rw_ds_1),
        SHARDING_COLUMN=id,
        TYPE(NAME="hash_mod",PROPERTIES("sharding-count"="4")),
        KEY_GENERATE_STRATEGY(COLUMN=id,TYPE(NAME="snowflake"))
);
c. Initialize encryption rules: Set up data encryption rules for enhanced security.
CREATE ENCRYPT RULE t_user (
    COLUMNS((NAME=password,CIPHER=password_cipher,ENCRYPT_ALGORITHM(TYPE(NAME='AES',PROPERTIES('aes-key-value'='123456abc'))))
));
By completing these steps, the configurations for the target database are initialized and ready for data migration.
Step 3: Start Data Migration Job
Now it’s time to initiate the data migration process itself.
-
Add the source of migration data source: Register the source database as an external data source with DistSQL.
REGISTER MIGRATION SOURCE STORAGE UNIT source_ds ( URL="jdbc:mysql://${source_database_url:port}/source_ds?serverTimezone=UTC&useSSL=false", USER="root", PASSWORD="root" ); -
Execute the migration command: Use the appropriate command to begin the data migration process. The command should specify the source database and the target cluster.
MIGRATE TABLE source_ds.t_user INTO sharding_db.t_user;
The result will provide details about the migration job, including the migrated tables, the job’s progress, and any potential errors encountered. Here is an example result, with source_ds indicating the source database’s data and sharding_db indicating the database created in ShardingSphere-Proxy:
mysql> MIGRATE TABLE source_ds.t_user INTO sharding_db.t_user;
Query OK, 0 rows affected (1.06 sec)
- Check Migration Progress
During the data migration process, you can monitor the progress and ensure its accuracy.
-
Query the migration list: Use the command “SHOW MIGRATION LIST” to retrieve a list of active migration jobs, including their IDs, tables being migrated, and job statuses.
-
Check migration status: Use the command “SHOW MIGRATION STATUS <jobId>” to view detailed information about a specific migration job, such as the number of tasks, processed records count, and the percentage of completion.
Step 4: Check Data Consistency
ShardingSphere provides the ability to check data consistency using DistSQL. This step is particularly useful when dealing with large amounts of data, as it allows independent verification of data sources before and after migration.
To check data consistency, ensure the following preconditions are met:
- Incremental data migration has started.
- The business read-only window period with sufficient time is available.
The result will show the tables, the consistency check result, and additional details about the check process:
mysql> SHOW MIGRATION STATUS j0102p000041c4912117c302e9facd92f9a74a478c;
+------+-------------+------------------+--------------------------+--------+-------------------------+-------------------------------+--------------------------+---------------+
| item | data_source | tables           | status                   | active | processed_records_count | inventory_finished_percentage | incremental_idle_seconds | error_message |
+------+-------------+------------------+--------------------------+--------+-------------------------+-------------------------------+--------------------------+---------------+
| 0    | source_ds   | source_ds.t_user | EXECUTE_INCREMENTAL_TASK | true   | 4                       | 100                           | 321                      |               |
+------+-------------+------------------+--------------------------+--------+-------------------------+-------------------------------+--------------------------+---------------+
1 row in set (0.04 sec)
Step 5: Submit the Migration Job
Once the consistency check is completed, you can submit the migration job to finalize the migration process. This step also includes necessary operations such as cleaning up PostgreSQL Replication Slot and refreshing table metadata:
mysql> COMMIT MIGRATION j0102p000041c4912117c302e9facd92f9a74a478c;
Query OK, 0 rows affected (2.79 sec)
With the migration job submitted, you can now switch the traffic to the tables migrated by ShardingSphere-Proxy, effectively utilizing the distributed database.
Summary
Traditional standalone databases often become bottlenecks due to their large table data size and rapid data growth. Scaling up the application server is ineffective in such cases, making database scaling-out necessary. ShardingSphere aims to reduce the impact on business operations by providing a comprehensive data migration solution, allowing traditional standalone databases to seamlessly transition to ShardingSphere and transform into distributed databases.
Throughout this guide, we have explored the data migration process using ShardingSphere. From configuring permissions and initializing the source database to executing the migration job and ensuring data consistency, each step contributes to a successful migration.
By leveraging the power of ShardingSphere, businesses can overcome the limitations of traditional databases and unlock the full potential of a distributed architecture. ShardingSphere offers features like data sharding, read/write splitting, and data encryption to enhance the capabilities of MySQL databases and provide improved performance, scalability, and security.
As you embark on your data migration journey, it’s important to ensure that all preconditions are met and to follow the recommended practices. By leveraging ShardingSphere’s power and versatility, you can overcome the limitations of traditional databases and unlock the full potential of a distributed architecture.
For any questions or suggestions related to ShardingSphere, feel free to share them on GitHub or join the ShardingSphere Slack discussions. We are here to support you in your data migration endeavors.